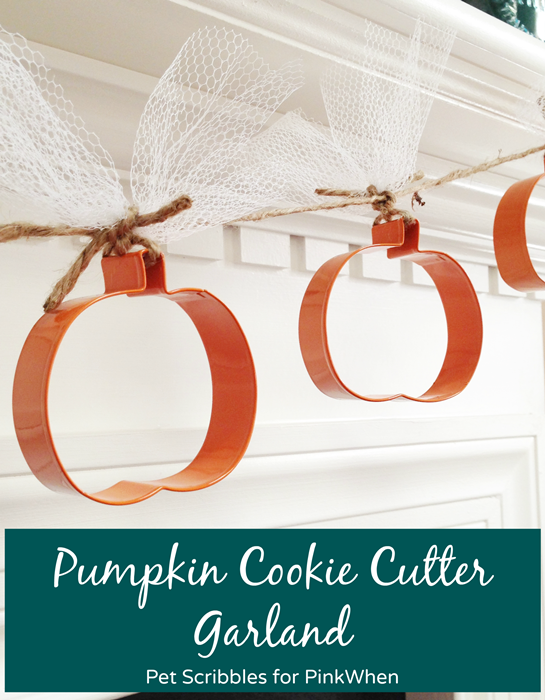
Hi everyone! Laura here from Pet Scribbles with another fun bit of Fall decor you can make: a pumpkin cookie cutter garland!
It all began when I saw these adorable pumpkin cookie cutters at Michaels for just 99 cents each! I love the muted orange color and knew right there in the store that I’d make a cookie cutter garland with them.
Here’s how you can easily make your own . . .
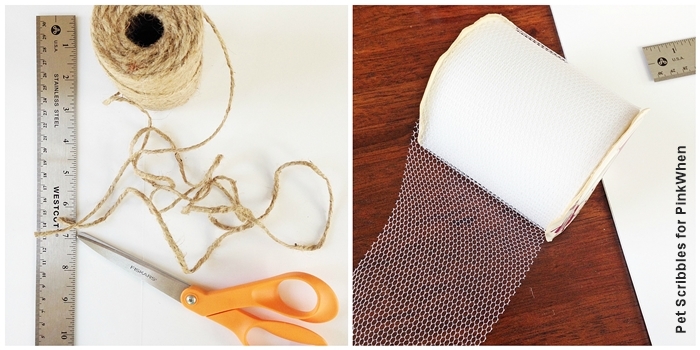
Supplies needed: a ruler, twine, scissors, tulle ribbon (wide if possible)

Step One: Tie a 12-inch piece of twine to the “stem” of each pumpkin cookie cutter. You’ll need the extra length (left over) for the next steps.
Step Two: Measure out how long you want your garland to be, and cut a piece of twine to that length. Keep the twine straight by pulling the ends and securing them under something heavy. (I used what was handy: heavy pumpkin candle pots!)
Step Three: Measure out how far you want your pumpkin cookie cutters spaced along the length of twine. I decided I wanted mine spaced 6 inches apart. Using a ruler, place the cookie cutters along the length of twine. When you’re happy with the spacing, attach each one by making a knot with the twine ends on each pumpkin.
I like to soften up the textures of metal and twine with vintage ribbon, and in this case decided to use some wide vintage tulle. (Garage sales are wonderful to find spools of vintage ribbon, or search on Etsy.)
Step Four: Measure out 12 inches of tulle and cut as many pieces as you have pumpkin cookie cutters.
Step Five: Scrunch up the width of tulle and fold it in half. Pinch it in the middle and hold with your fingers. One end is a bow, and the other end has open edges.
Step Six: Using those twine pieces still hanging from each pumpkin cookie cutter, attach the tulle by tying the twine around the center of each shabby bow, as shown:
Step Seven: Attach the tulle to the top of each cookie cutter in the same manner.
Step Eight: Trim the long edges of twine above each cookie cutter.
And that’s it! You have a pretty pumpkin cookie cutter garland!
You can enjoy this through the Thanksgiving holiday, and best of all? You can simply pack it away and display it again next year!
And here’s a fun variation: If you can’t find orange-colored cookie cutters, use the metal-colored ones that are more widely available. (I’ve seen the metal ones everywhere, at both craft and dollar stores.) Instead of white tulle, use orange tulle or another Fall color. (You can find rolls of decorative tulle ribbon at the craft store in quite an array of colors for each season.)
Happy crafting!
~Laura


This is adorable!! I think I need to make this for my kitchen!
I am totally in LOVE with this awesome sauce project. Laura K rocks!!!
Oh, very nice! Totally not too hard to do either. I can see doing this for a fall-themed baby or bridal shower.
these are cute!!
Aren’t they? 🙂
What a neat idea! This could be done each season using different cookie cutters too! Fantastic! I’ve love to have you share this at my weekly link party! http://www.thelifeofjenniferdawn.com/2014/10/a-little-bird-told-me-link-party-112.html Hope to see you there!
It is super cool!
Hello Jennifer,
I looked for print this Pumpkin cookie cutter decors. I love it. It are awesome and cutest. Where is print?
It’s not a print, they are cookie cutters you buy and create the garland with 🙂
SUPER cute! What a great idea.