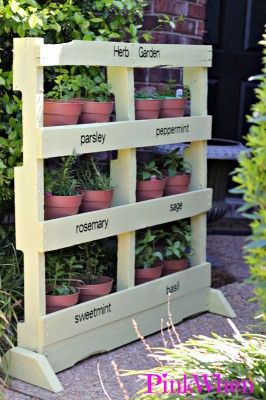
Last year I created an amazing post for a DIY vertical pallet herb garden. It is simply one of the best projects I have ever created, and today I am re-sharing that post for a couple of reasons. Mainly I am re-sharing because the instructions I gave for how to actually build the herb garden were slightly horrendous. This is going to be much easier to follow pallet garden tutorial.
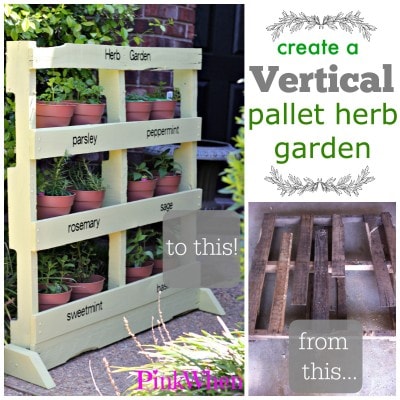
CREATING A VERTICAL PALLET GARDEN
This was such a fun project and I love to use my pallet herb garden year after year. It’s perfect for small yards or apartments, and I love to have the fresh herbs on hand.
CAN I MAKE A GARDEN WITH PALLETS?
YES! In fact, there are several different ways you can make a pallet garden. If you are in a small space like I am, you might want to make a vertical pallet garden. This garden is able to stand up and save space while working hard for you.
If you have extra room in your yard you can always lay the pallets down flat and garden by using the slats as your dividers for different plants.
HOW DO I MAKE A PALLET GARDEN?
I have put together the instructions on how I created my pallet herb garden in a simple step by step format. Leave me a comment if you have any questions.
Here are all of the supplies that are needed for this pallet garden project.
- pallet
- drill
- kreg jig
- 2 1/2″ screws
- 1 x 4 boards cut to fit (for shelves)
- paint (optional)
- vinyl lettering (optional)
PALLET HERB GARDEN INSTRUCTIONS
Step 1: Measure the length for the shelves you will need for your 1 x 4 boards. I had such a bad pallet starting out that I literally had a different measurement for every board. If you are able to get your hands on a fairly new pallet, you should be just fine. the measurements for each of my shelves were between 17 1/2″ and 18″ in length.
Step 2: Once you have all of your measurements for the shelves, use your Kreg Jig and place your pocket holes on each end of the shelves. This will allow you to secure them to the frame easily. (See picture below)
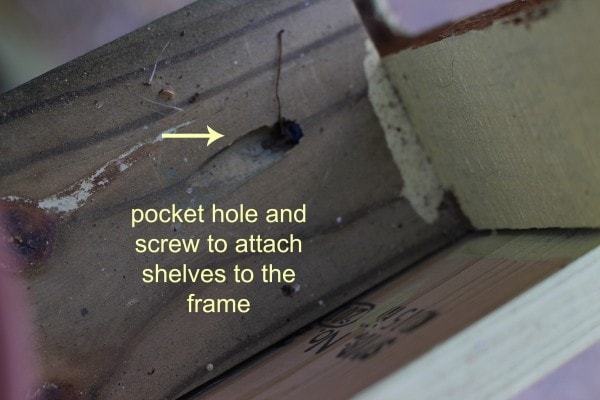
Step 3: After you have finished with the pocket holes, attach them to the pallet frame with the screws by using the drill and 2 1/2″ screws.
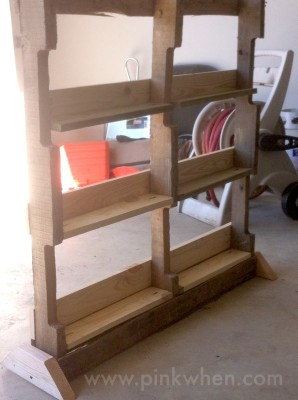
Step 4: For the feet, I had leftover boards from a farmhouse table I had recently built. You can take a 1 x 4 and cut it to attach feet onto the bottom of your pallet to make it free standing. Otherwise, you can also lean it up against a wall. (My feet were angled and cut from a 2 x 4.)
Step 5: (Optional)Once you have all of your shelves in place, it’s time to sand. Sand the front of your pallet to even everything out before you paint. Make sure you wipe clean before you paint your first coat. Then apply the paint to your pallet.
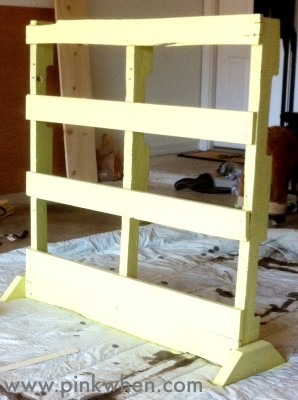
Step 6: (Optional)After the paint has dried, attach your vinyl letters for easy identification of all of your herbs.
After you have your pallet finished, the only thing left to do is add your herbs. Just don’t forget to water! I hope you enjoyed this updated version of the DIY Pallet Herb Garden and can now easily create your own.
WHAT CAN YOU GROW IN A PALLET GARDEN?
There are so many options! Depending on your climate and where you are located, the sky is the limit. Here are a few things you could consider:
- herbs
- peppers
- strawberries
- other berries
If you have the room, you can use the pallet garden as your starter garden and then replant them into a larger space once they have started to outgrow the pallet.
WHERE CAN I FIND A PALLET?
Pallets can be found at most large outdoor stores, but some won’t allow you to purchase or take them. Your best bet is to reach out to local moving and furniture stores, and also wood salvage shops. A typical price for a pallet can start at $10 and go from there.
If you are looking for other ideas for pallets, check out this great list awesome pallet projects. The sky is the limit!


Thanks for sharing this project, Jennifer!
It looks so pretty! Great tutorial, too. Isn’t that Kreg jig just the best?
Val
I LOVE the Kreg Jig!
What a clever idea. I love it and such great storage.
If I didn’t kill everything I tried to grow I would love to grow my boyfriends mother one of these. She has so many pots on the back deck at her house. It would be fun to look at and have them s together.
This is awesome! I think I may give this a try this summer, I love the stenciling of the herbs on it! Sweet idea, thank you for sharing!
Smiles!
Terry
I love this idea! This is perfect for our family and the little bit of outdoor space we have. I can’t wait to get on this!
Perfect for my small yard. Thank you so much for sharing!!
Jennifer, I just love this! It’s probably the prettiest pallet garden project I have seen. Thanks so much for the inspiration:)
You are so welcome, and thank you for commenting. 🙂
Hi Jen! This is fantastic and what a great way to expand our growing area! Love! Thank you so much for sharing at Best of the Weekend – pinned, tweeting and sharing on FB today. Hope you had a great Mother’s Day and happy Tuesday!
Thanks so much Cindy!
I love this herb garden…
the prettiest pallet project I’ve seen!